This fun fall craft is adorable and so much fun to make! The kids are sure to get plenty of fine motor skills practice with cutting, pasting, and folding. Once the glue has completely dried, these owl crafts would make a fabulous classroom display. Perhaps a “Whooooo is ready to learn?” bulletin board? Or maybe a “Kindergarten will be a Hoot” display? There are so many options to explore with this owl craft for kids!
*Pair this with our Fall Centers and Activities for Pre-K and Kindergarten!

This owl craft is so simple to make with just a few simple supplies. You’ll want to make it every year! Your students will be excited to see it proudly displayed at home or in the classroom!
Gather your materials:

To begin, make the branch by cutting the bottom off the paper bag, and cutting the construction paper in half.
Next, invite students to carefully roll up the paper bag to look like a branch.
Glue the branch into place along the bottom of the paper. Press the branch down firmly until the glue begins to be tacky.

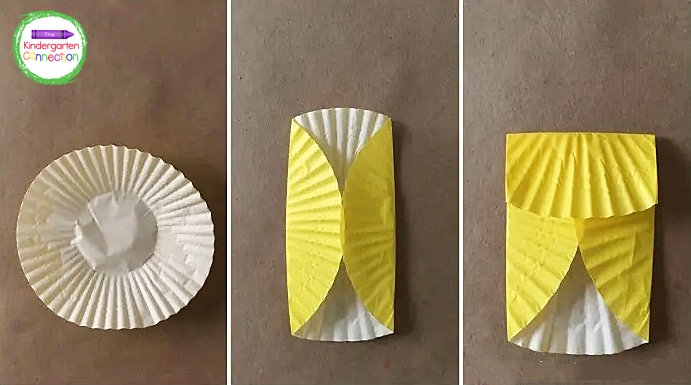
To make the owls, flatten a cupcake liner onto a flat surface as shown.
Next, fold each side towards the center to create the wings.
To make the owl’s head, fold the top edge down and glue into place.
Glue the owls onto the blue construction paper along the branch.
To make the eyes, add circles of white construction paper. For the pupils, rip small pieces of black tissue paper, and roll into balls.
Cut the beak from a piece of yellow construction paper.
Glue the beak, eyes, and pupils onto each owl. Be sure to allow the glue to dry completely.

We had a hoot making our owl crafts, and I hope you do too! Whoooo is ready to get crafty?
Your planning will be so much easier with instant access to:
Be sure to request an invitation so that you don’t miss your chance to be part of the best early childhood club around!


2 Responses
Thanks so much for posting this super-cute project! Our Kinder team did Art Rotations today and I was able to share your cute project with three classes. So happy to create a fun project that helps with their fine-motor skills.
Hi Lisa,
How WONDERFUL! Thank you so much for sharing this with us. What a fun teacher you are…your students are SO lucky to have you.
Have a fantastic school year!