Easy Sun Craft for Kids
This post contains affiliate links for your convenience. View our full disclosure policy here.
It’s finally warming up in my corner of the world, so it seemed fitting to bring a bit of sunshine indoors with this fun and easy Sun Craft for Kids! It is a simpler, yet still colorful twist on a traditional God’s Eye craft. With this activity, your kids will fine-tune their fine motor skills with the weaving and beading action, without the need for teacher assistance to tie in new colors of yarn. It’s sure to be a hit and makes a beautiful display at home or in the classroom!
*Pair with our Kindergarten Printables BUNDLE for Summer!

Sun Craft for Kids
We’ve been on a bit of a weaving craft streak since making our Rainbow Paper Plate Loom earlier this spring. I just love the focus that weaving brings out in children.
Of course, you could still provide different colors of yarn for children if your class is capable of tying knots and can tie in those new colors independently, but I think the beads do a good job of adding in extra color without as much frustration. Children still get some knot tying opportunities at the beginning and end of the craft.
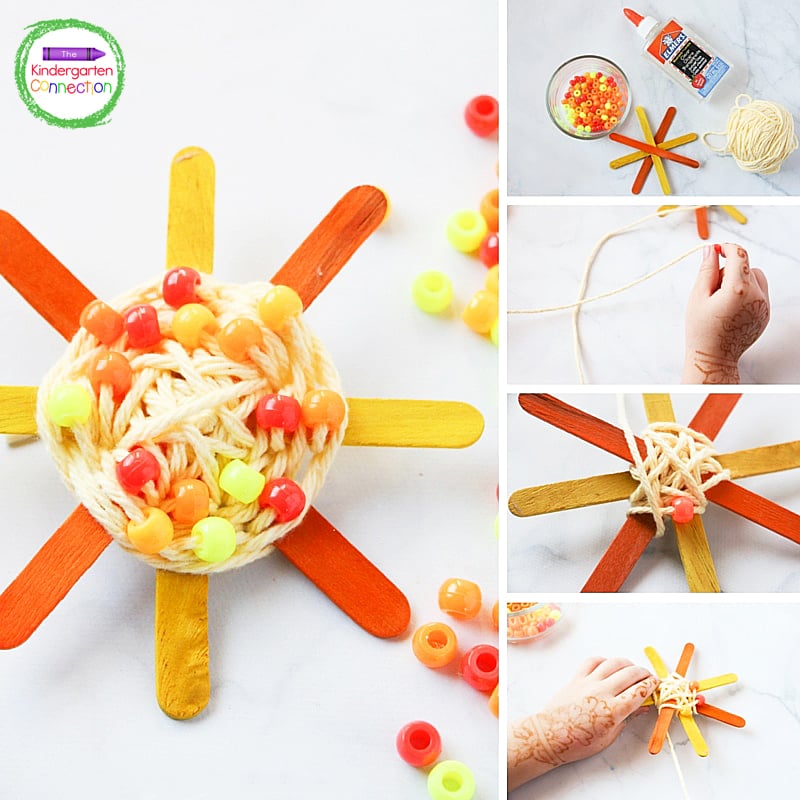
Supplies Needed:
- 3ft length yarn in yellow or orange – one end taped for easy bead stringing
- 4 popsicle sticks, sun colors (Multi-color packs are great to always have on hand!)
- 16-24 pony beads, sun colors
- Glue
These materials are perfect for the classroom because they can be purchased in bulk and are very low cost. The pony beads come in giant packs and can be used in so many different crafts or learning activities. The popsicle sticks can be purchased already painted and also have so many uses (they make great counting tools).

Teacher Tip: To make things easier, prepare the popsicle stick “stars” before craft time. Use hot glue to attach two sticks in a cross shape. Then angle an additional stick on top and one underneath. If your children are not yet able to tie the first knot (securing the yarn to the frame) you can also do this step ahead of time. Also – make sure to tape the ends of the yarn like a shoelace. This prevents the yarn from fraying as the children are lacing the beads on.
Making the Sun Craft
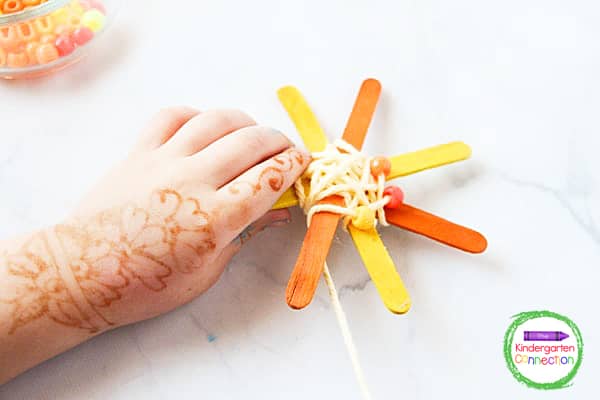
To begin, tie the yarn to the popsicle stick frame. Twist the yarn over the center of the frame, crossing the center several times to cover up the center of the frame with yarn. When the centers are adequately covered, have the students add a single bead to their yarn.
Next, pull the bead down to where they want it on the frame. Secure it by looping the yarn around the same stick or a neighboring stick. Encourage the children to explore patterning with their beads, if they are interested.

Keeping the yarn secure but not pulling it too tight is an exercise in control. The children will learn to self-correct throughout the craft. Remembering to loop after threading on a bead is also an exercise in paying attention and focusing on their work. But this craft is also very forgiving, so it is engaging without being frustrating.
RELATED RESOURCE: Summer Centers and Activities for Pre-K & Kindergarten
We also added several lines of just weaving in between each circle of beads, but children really should feel free to make this craft their own. If they want to add only red beads, if they want to add only one bead per circle, or loop twice around each stick – let them! Experimenting with the crafting process is a great way to see how small details add up to a bigger result.
Another nice thing with this craft is that children can easily undo a bit of their work and take a different approach if they don’t like how something turned out.
When the sun craft is complete, tie the end of the yarn to one of the beginning pieces on the back of the craft. Cut off the end of the yarn with the bit of tape on it. Optionally, you can add an additional loop of yarn for hanging your sun crafts.
Want unlimited access to even MORE of our activities and resources? Join us in the Print and Play Club!
Your planning will be so much easier with instant access to:
- hundreds of printables
- every TKC resource
- video lessons
- a digital games vault
- Pre-K and TK Scope & Sequence
- a PLAYlist of fun songs AND activities
- professional development
- additional teacher resources…
Be sure to request an invitation so that you don’t miss your chance to be part of the best early childhood club around!

- Sensory Play Alphabet Soup Activity - May 8, 2023
- DIY Magic Watercolor Painting Sheets - February 15, 2023
- Letter D Craft – D is for Dinosaur - February 10, 2023
I’m the Editor of Fun Family Crafts and wanted to let you know that we have featured your beaded sun project! You can see it here:
https://funfamilycrafts.com/easy-beaded-sun-craft/
If you have other kid-friendly craft tutorials, we’d love for you to submit them. Thanks for a great project idea!